MODULE 9

CITRIX PROGRAM NEIGHBORHOOD OVERVIEW
Used to access Xp servers on a network.
PN can be used on client devices running :
MODULE 9

CITRIX PROGRAM NEIGHBORHOOD OVERVIEW
Used to access Xp servers on a network.
PN can be used on client devices running :
Client devices can use PN to :
Application types
All ICA clients can connect to two types of applications :
1. start a specific application or server's desktop.
The administrator ,with CMC ,pre-configure applicatios and server desktops into
published applications.
Can run on a single server or balanced to run on a multiple servers.
If the published application is load balanced ,the data collector determines
which server should run the application ,based on the load balancing parameters
specified for the XP servers.
Users of ICA win32 ,Java and Nfuse clients ,who have been given access to the
application ,will see the application in their PN ,while users of other IcA
clients need to add the published application to their Remote Applications Manager
before they can use the application or use the ICA passthrough.
2. start an application ,video or server desktop on a particular server.
This differ from a published application ,which is configured on a server does
not require application-specific information from the user.
Types of users
Published applications can be run from two types of users listed below :
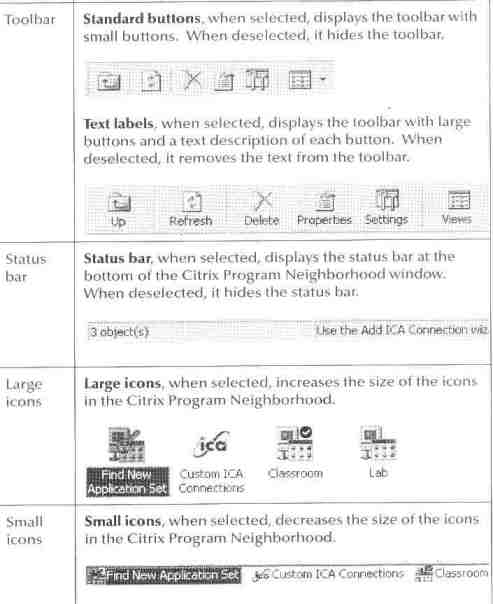
CITRIX PROGRAM NEIGHBORHOOD
PN is located on the desktop of the ICA win32 client device and can also be accessed from the Start/Programs/Citrix ICA Client menu.
CITRIX PROGRAM NEIGHBORHOOD INTERFACE

Allow users to run appl. located on XP servers.
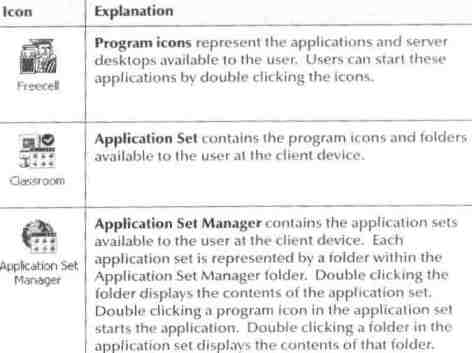
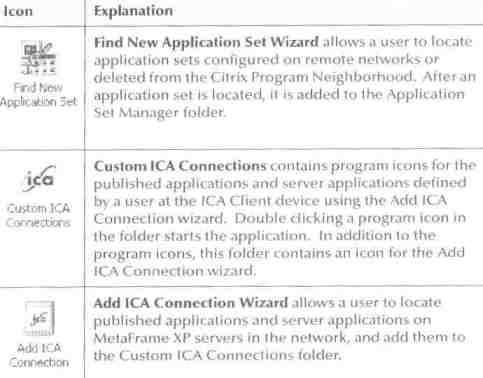
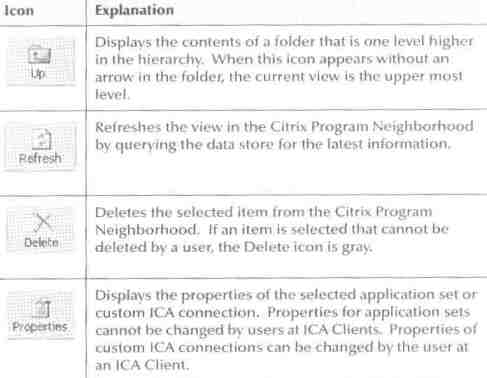
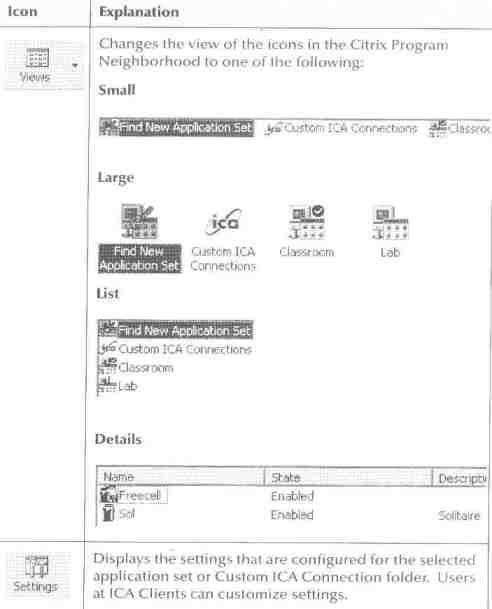
USING CITRIX PROGRAM NEIGHBORHOOD
If a user has rights to use a particualr application ,it will appear in the Citrix PN.
Defining a Default Set of Applications
PN contains the appl. sets that administrators define and the custom ICA connections
the users define.
To use an application ,users open the folders containing the application and
double click the appl. icon to start.
Its possbile to set an application set as default to reduce the number of steps
to access a published applications ,a little mark is added to the icon of the
application set ,so the next the PN is opened ,the icons within the default
folder are displayed.
Starting an application
When users double click a program icon ,one of two things happen :
Closing, Disconnecting and Reconnecting to an Application
Whe the user is done using an application in an application set, the application
can be closed without affecting other running applications.
The connection to the XP server will exist until all applications in the application
set are closed.
To close an application do one of the following :
Not every application supports all of the above methods for closing an application.
If a user or a connection is configured to run in a disconnected state, a user
can disconnect from an application, rather than close it.
In a disconnected state, the application continues to run and process information
in a session on the XP server, but the application is not displayed on the user's
device.
This happen until the timeout is reached ,or the user reconnect to the disconnected
session.
To disconnect from an application, a user can do one of the following :
To reconnect to a disconnected session, do one of the following :
Configuring Global Settings
Custom ICA Connection and the application set folder have global settings that
affect the custom ICA connection and the applications within them.
To customize this settings : right clicking the 'Custom ICA Connections' folder
and clicking 'Custom Connections Settings' and right clicking an application
set folder and clicking 'Application Set Settings'.
This is possible using File menu items or Settings icon in the toolbar too.
The settings for a custom ICA connection override the global settings.
The settings for individual applications within an application set cannot be
changed, but can only be altered as a group by changing the application set
settings.
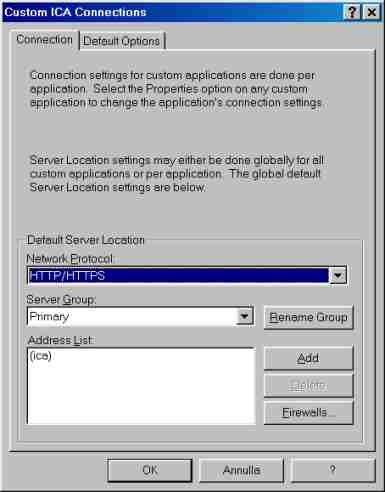
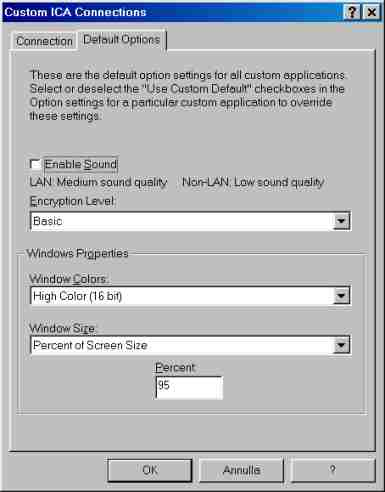
The global settings for the Custom ICA Connections folder have two tabs : 'Connection'
and 'Default Options'.
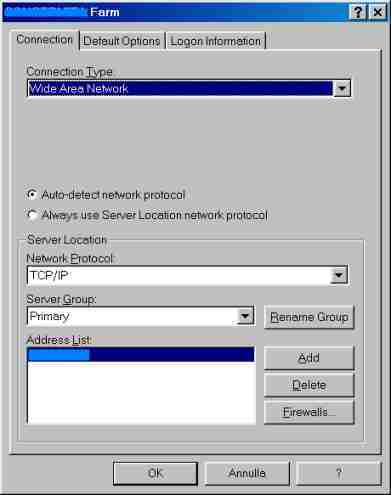
The global settings for an application set have three tabs : 'Connection', 'Default
Options' and 'Login Information'.
THE GLOBAL SETTINGS FOR CUSTOM ICA CONNECTIONS
THE GLOBAL SETTINGS FOR APPLICATION SET
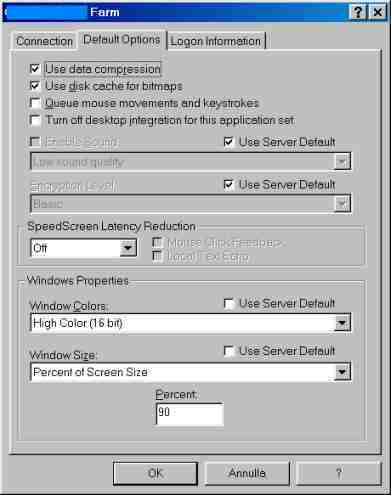
N.B.: application set settings only
![]() Specifies
whether the network protocol should be auto-detecting during the connection
attempt or a specific protocol should be used.
Specifies
whether the network protocol should be auto-detecting during the connection
attempt or a specific protocol should be used.
N.B.: application set settings only
![]() Network
Protocol : identifies the network protocol that the custom ICA connections
and applications within the application set should use.
Network
Protocol : identifies the network protocol that the custom ICA connections
and applications within the application set should use.
If multiple protocols are installed and an application is published with multiple protocols, the protocol to be used will be selected in the following order :
N.B.: application set settings and Custom ICA connection settings
![]() Server
Group : identifies the group to which the addresses will be added.
Server
Group : identifies the group to which the addresses will be added.
5 is the max number of addresses in each group.
The first group is the Primary, Backup1 and Backup2.
All the addresses in the group are contacted simultaneously.
The first server to respond to the request (Custom ICA or application) will
be accepted.
If no server in the Primary group repsonds after five seconds ,the servers listed
in Backup1 will be contacted.
If the servers are in the same subnet and the broadcasts are enabled ,no addresses
needed to be entered in the Address List field.
N.B.: application set settings and Custom ICA connection settings
![]() Address
List : identifies the server contacted.
Address
List : identifies the server contacted.
N.B.: application set settings and Custom ICA connection settings
![]() Use
Data Compression reduces the amoount of data that needs to be transferred
over the connection but incresases the amount of processor resources needed
ont the server to handle the compressing and decompressing of the data.
Use
Data Compression reduces the amoount of data that needs to be transferred
over the connection but incresases the amount of processor resources needed
ont the server to handle the compressing and decompressing of the data.
Useful over WAN links.
N.B.: application set settings only
![]() Use
disk cache for bitmaps stores commonly used graphical objects such
as bitmaps in a local caache on the client device.
Use
disk cache for bitmaps stores commonly used graphical objects such
as bitmaps in a local caache on the client device.
If the bandwith is limited, enable this feature to increase the performance.
N.B.: application set settings only
![]() Queue
mouse movements and keystrokes reduces the number of network packets
sent from ICA client to the XP servers, and also reduces the overall responsiveness
of the sessio to keyboard and mouse movements.
Queue
mouse movements and keystrokes reduces the number of network packets
sent from ICA client to the XP servers, and also reduces the overall responsiveness
of the sessio to keyboard and mouse movements.
This setting is NEVER selected by default.
N.B.: application set settings only
![]() Turn
off desktop integration to the application set keeps the application
set from being automatically added to the client device's desktop.
Turn
off desktop integration to the application set keeps the application
set from being automatically added to the client device's desktop.
This setting is NEVER selected by default.
N.B.: application set settings only
![]() Enable
sound allows to transfer sound to the client device.
Enable
sound allows to transfer sound to the client device.
The client device must have a sound card installed.
The quality of sound for the applications can be configured while for the ICA
connections is preset to medium for LAN connections and low for non-LAN connections.
If 'User Server Default' is selected the sound quality defined by the administrator
will be used.
N.B.: application set settings and Custom ICA connection settings
![]() Encryption
level selects the level to be used.
Encryption
level selects the level to be used.
Basic,40-,56- and 128- are available.
Default is Basic.
If 'Use Server Default' is selected for an application set ,the level defined
by the administrator will be used.
N.B.: application set settings and Custom ICA connection settings
![]() Speedscreen
latency reduction enhances the user on lower network connections by
decreasing the delay between user input and screen display.
Speedscreen
latency reduction enhances the user on lower network connections by
decreasing the delay between user input and screen display.
This setting is only available if the XP server is configured for latency reduction.
The user can toggle SLR on or off using CTRL+F4.
N.B.: application set settings only
![]() Windows
colors specifies the color depth should use on the ICA client device.
Windows
colors specifies the color depth should use on the ICA client device.
The disply adapter of the client must support the color depth otherwise the
connectin will be displayed in the highest color depth available.
The color depth available are :
If 'Use Server Default' is selected ,the color depth defined by the administrator
will be used.
N.B.: application set settings and Custom ICA connection settings
![]() Windows
size specifies the windows size is displayed on the ICA client device.
Windows
size specifies the windows size is displayed on the ICA client device.
N.B.: application set settings only
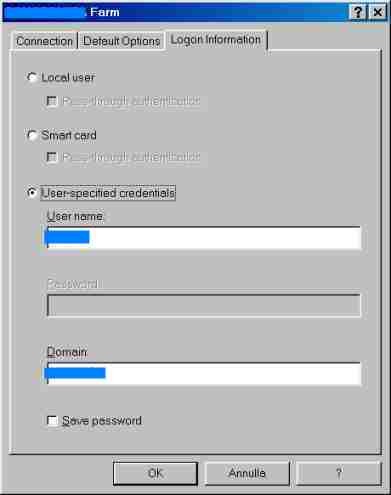
LOGON INFORMATION TAB (only for Application Set Settings)
![]() Use
local username and password specifies that the local username and password
should be passed to the server as the logon credentials.
Use
local username and password specifies that the local username and password
should be passed to the server as the logon credentials.
Eliminates the need for multiple authentications and is referred to as PassThrough
authentication.
![]() Username
specifies the account name of the userr accessing.
Username
specifies the account name of the userr accessing.
![]() Password
identifies the password the user to access.
Password
identifies the password the user to access.
This property is gray unless the Save Password property is selected.
![]() Domain
specifies the domain in which the user's account and password can be
verified.
Domain
specifies the domain in which the user's account and password can be
verified.
![]() Save
password specifies that the password should be saved after all connections
are closed and the PN has been closed.
Save
password specifies that the password should be saved after all connections
are closed and the PN has been closed.
If the Basic encryption level is not specified the logon information will be
ignored and the user must log on.
If Save password and Use local username and password are not selected, the password
will only retained while the current connections and the PN remains open.
FINDING NEW APPLICATIONS SETS
When an administrator publishes an application this is added to an application
set.
If a user has access to the new published application within an application
set, that application will appear automatically in the user's citrix PN.
Find New Application Set allows a users to locate and add applications sets from other server farm to their Citrix PN and uses the following info to find and configure the application set :
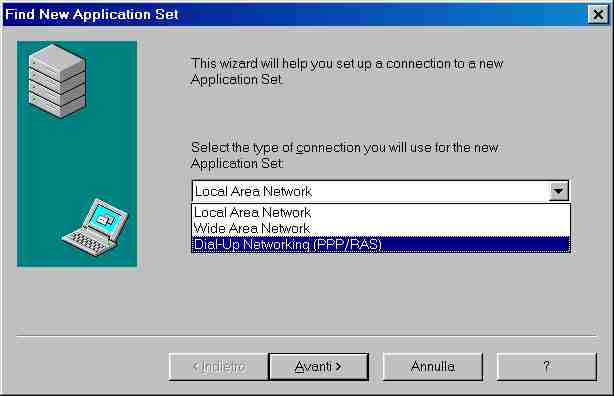
Specifies how the XP server will be accessed :
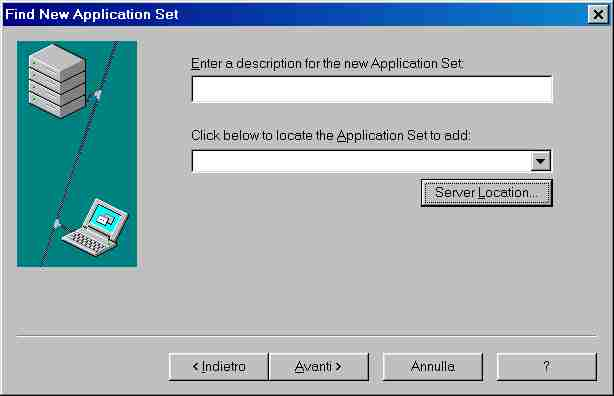
Specifies the title that will identify the application set in the PN, must
be different from the other entry in PN.
Application set lists all application sets available, if the application sets
does not appear, the user can type the name or address of the application set
into field, or click Server Location to search the application set.(Next photo).
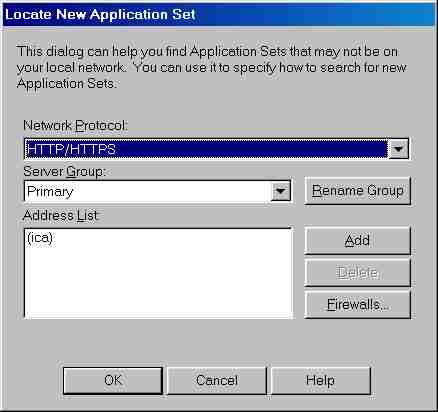
View 'Global settings for custom ica connections'.
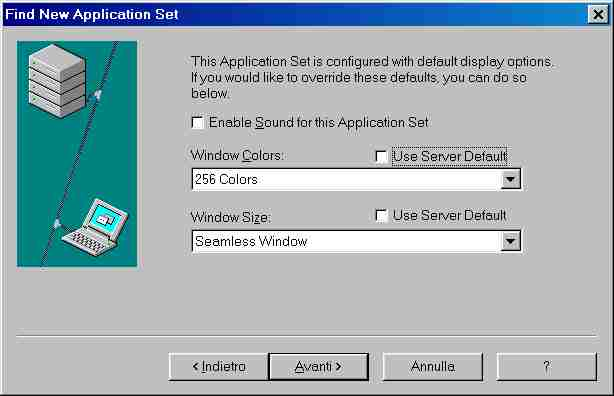
Enable sound for this application set : Enables the application to sends
aound to ICA client device and can only be heard if a sound card is installed
on the client device.
Windows color : specifies the color depth the application set should
use on the ICA client device.
Windows size : specifies the windows sizes.
When the Find New Apllication Set Wizard finishes, an icon for the application
set is added to citrix PN.
Applications within the application set an be started by double clicking the
application set and then application's program icon.
By default the find new application set wizard configures the following settings based on the Connection Type selected :
Users can change the settings for the application set in the PN by clicking the application set and the settings icon.
CREATING CUSTOM ICA CONNECTIONS
User can add published applications, unpublished applicatons and server desktops
to their PN using the Add ICA Connection wizard.
To do this use the Add ICA Connection icon in the Custom ICA Connection folder.
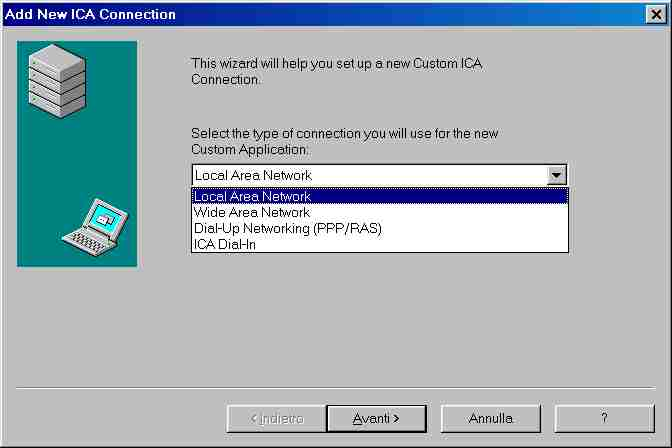
Identifies how the XP server containing the server desktop ecc... will be accessed.
The only difference between the application set is the ICA Dial-In connection
option : connects to XP server using a modem.
If this connection option is chosen, users can select and configure a modem.
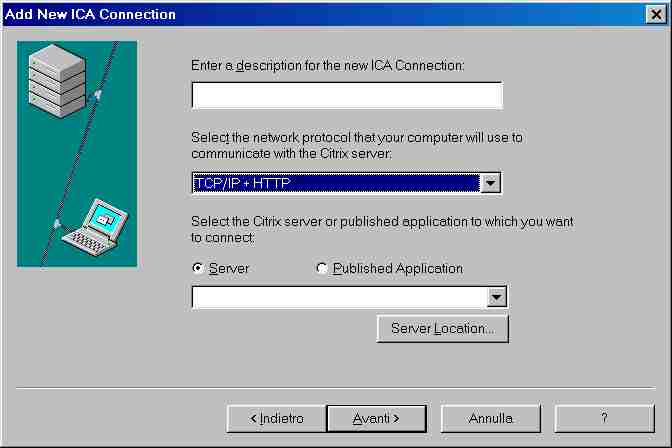
The Description must be different from other entries in the Custom ICA Connection
folder.
Network protocol identifies the network protocol used to access the application
or server desktop on the XP server.
The protocol must be installed on the client device.
Network protocol include : TCP/IP, TCP/IP+ HTTP, IPX, SPX, NetBIOS.
Server lists all XP servers that use the selected protocol.
The server's name or address can be typed in the field.
Published application lists all applications configured on the XP servers.
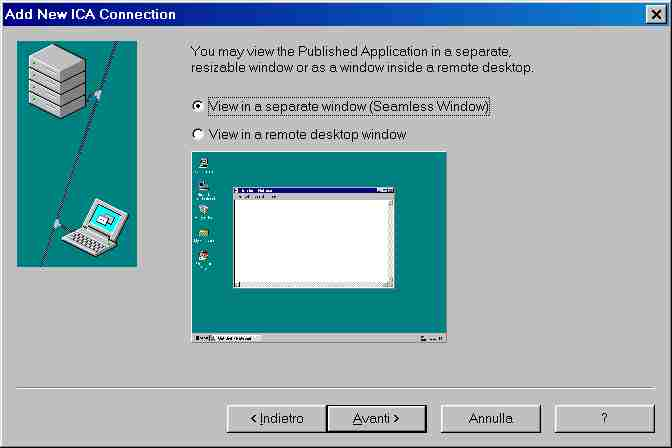
Configures the custom ica connection to run in a separate window ,appear and
behave as if it were running locally.
Configures to run within an ica session window.
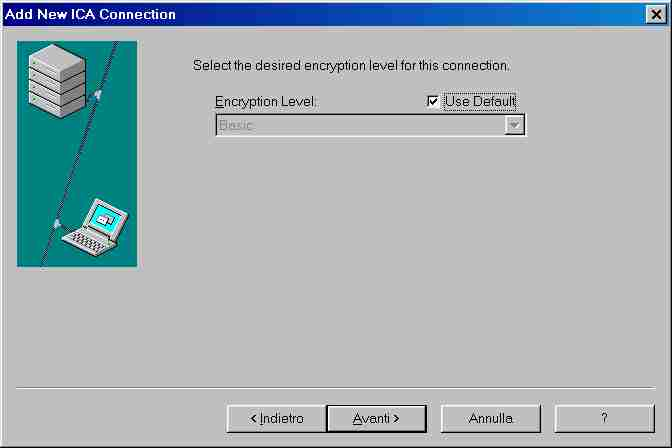
Specifies the encryption level that should be used woth the custom ica connection.
The default level is Basic.
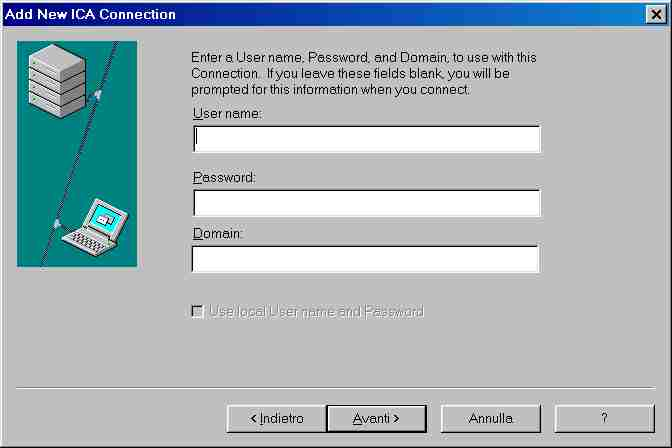
When blank, specifies that users must supply the username, password and domain
when the custom ICA connection is started.
When completed, these fields are not displayed to the user when the ica connection
is started.
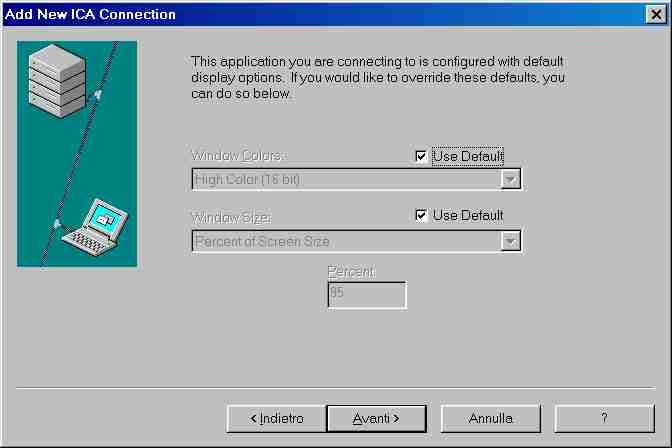
Specifies the color depth and the window size the custom ica connection will use on the client device.
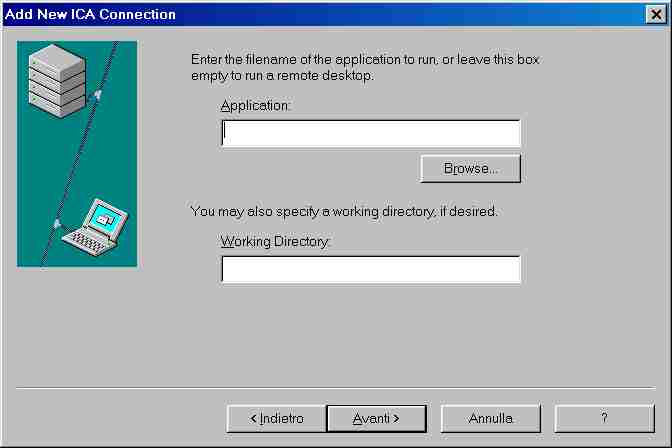
Application identifies the executable name of an application found on the server
selected on a previous screen.
This choice is only available if a server, rather than a published application.
Working directory identifies the working directory to use with the application.
When the Add ICA connection wizard finishes, the icon is added to the folder.
By default the Custom ICA Connection wizard configures the following settings based on the Connection Type selected :
Users can change the settings for the Custom ICA Connection in the PN by clicking the custom ICA connection's program icon and the Properties icon.
CUSTOMIZING APPLICATION SETS AND CUSTOM ICA CONNECTIONS
This feature allows users to have the applications that they use set up specifically to their liking.
Placing Application Icons on the Desktop : If a particular
application set or ica connection is used frequently,a user might want to add
the icon to the local desktop.
There are two methods of adding an application icon to the desktop :
1. are created by :
N.B: desktop's shortcut are not deleted automatically must be deleted manually.
2. are created automatically for an application in an application set if Add
Shortcut to the Client's Desktop was selected when the application was published.
If Add to the client's Start Menu was selected the application name will appear
in the client's start menù.
Users at client devices can disable desktop integration (desktop and start
menù) by changing the settings of an application set to Turn off Desktop
Integration for this Application Set.
After this feature is disabled the icons are deleted automatically.
N.B.: Desktop shortcuts can be distinguished from a desktop integration icon
by opening the properties of the icon, on the shortcut tab there is /DI parameter.
N.B.: Custom ICA connections cas use desktop shortcuts, but not desktop integration
icons.
Deleting Custom ICA Connections : deleting an icon does not
the application from the XP server.
To delete a custom ica connection, use the File --> Delete menu items, use
the Delete icon in the PN toolbar or by right clicking on the icon and select
Delete.
N.B.: deleting a desktop shortcut does not remove the program icon from the Custom ICA connections folder or an application set folder.
Renaming Application Sets and Custom ICA Connections : application
sets receive their name from the name of the server farm on which they were
created.
To change the name of a custom ICA connection or application set, use the File
--> Rename menu items or right click the item and click Rename.
N.B.: users cannot rename the Custom ICA Connections folder or individual applications
within an application set.
N.B.: users can rename an application set.
However, when they refresh or restart the PN, two copies of the application
set will appear.
Duplicating Application Sets and Custom ICA Connections :
users may want to customize an application set or custom ICA connection without
affecting the properties and settings of the original can duplicate them.
To duplicate use the File --> Duplicate item menu or right click and click
Duplicate.
N.B.: users cannot duplicate the Custom ICA connection folder or individual applications within an application set.
Copying a Published Application to Custom ICA Connections : to copy a published application from an application set to the custom ica connections folder use the File --> Copy to custom connections menu items or right click and click Copy to Custom Connections.
Changing Properties of Individual Custom ICA Connections :
users cannot change the properties of individual applications in an application
set.
However they can chagne the properties of a custom CIA connection.
To change the properties of a custom ICA conection right click and click Properties
or use the Properties icon in the toolbar.
The properties window has four tabs : Connection, Options, Login, Information
and Application.
N.B.: la spiegazione delle singole voci contenute nelle varie 'linguette' sono descritte sopra.
CUSTOMIZING ICA SETTINGS
Users can adjust PN to best suit their client devices.
To customize the ICA Settings use the Tools --> ICA settings menu item.
ICA settings has four tabs :
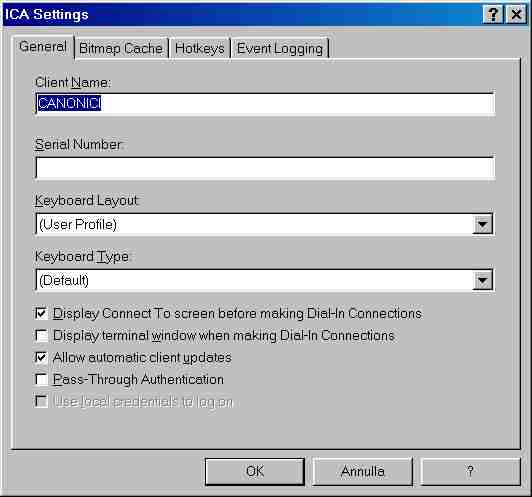
Client Name : identifies the client device.
XP server use this to identify the resources associated with the client device,
such as mapped printers and disk drives.
Serial Number : is the serial number of the Citrix ICA Client
Software supplied by the Citrix PC Client Pack.
If the Citrix PC Client Pack is not being used, the field should be left blank.
Keyboard Layout : specifies the layout of the keyboard attached
to the ICA client device.
If user profile is selected, the keyboard layout specified in the user's profile
is used.
Keyboard Type : specifies the type of keyboard attached to
the ICA client device.
The default option works for most US and european keyboards and is capable of
detecting the appropriate Japanese keyboard.
Display connect to screen to screen before making dial-in connections
: displays the connect to screen, which has the telephone number being dialed
and allows users to select a different location from which to dial.
Display terminal window when making dial-in connections : displays
a terminal window so an ASCII dialog can be entered before connecting to a XP
server.
This is useful if dial-in configuration uses third party products, such a security
devices and X.25 packet assembler/disassemblers (PADs).
Allow automatic client updates : specifies that a XP server
is allowed to update the ica client software on the client device when newer
version become available.
Pass-through authentication : eliminates the need for multiple
authentications.
Use local username and password for logon
: identifies the username and pasword that will be passed to the server as logon
credentials.
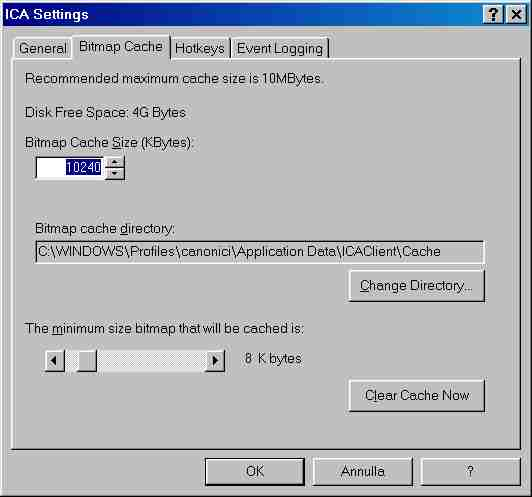
Amount of disk space to use : specifies the percentage of
the partition containing the bitmap cache directory that is set aside to hold
cached bitmaps.The default is 1%
Bitmap cache directory : specifies the directory to store the
cached bitmaps.
A different directory can be specified with the Change Directory button :
The minimum size bitmap that will be cached is : specifies
the smallestbitmap that will be cached to the bitmap cache directory on the
client device.
Bitmaps smaller than the specified size will be sent when the client device
needs them.
Bitmaps larger than the specified size will be cached and re-displayed from
the cache on the client device when they are needed.
The default size is 8KB.
Clear cache now : removes all currently cached bitmaps from
the directory.
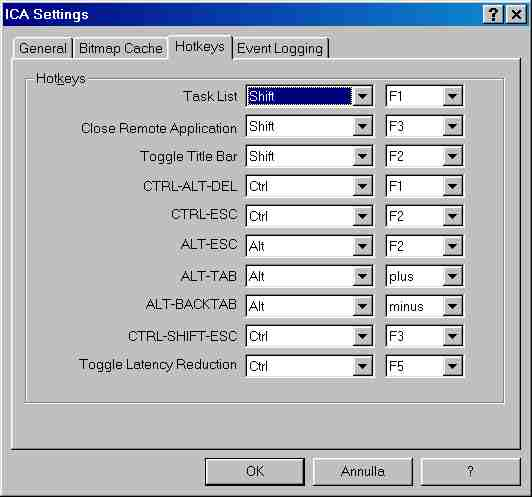
Task list : specifies the keys that display the local Start
menu or local task list.
The default value is SHIFT+F1.
Close remote application : specifies the keys that ckose a
published application.
The default value is SHIFT+F3.
Closing the published application in this manner will :
Toggle title bar : specifies the keys that display or hide
the title bar of the session in which a custom ICA connection is running on
the client device.
The default value is SHIFT+F2.
The toggle title bar hotkey must be used to return to a seamless window if the
windows security dialog is accessed using the CTRL+ALT+DEL hotkey.
CTRL-ALT-DEL : specifies the keys that display the windows security
dialog on the client device.
The default value is CTRL+F1.
CTRL-ESC : specifies the keys that display the local start
menu.
The default value is CTRL+F2.
ALT-ESC : specifies the keys that display an application taskbar
containing icons of all application running on the client device.
The default value is ALT+F2.
ALT-TAB : specifies the keys that display an application taskbar
containing icons of all applications running on the client device.
The default value is ALT++.
ALT-BACKTAB : specifies the keys taht display an application
taskbar containing icons of all applications running on the client device.
The default value is ALT+-.
CTRL-SHIFT-ESC : specifies the keys that display the windows task manager.
The default value is CTRL+F3.
Toggle Latency Reduction : specifies the keys that enable and
disable the Speedscreen Latency Reduction feature.
The default value is CTRL+F4.
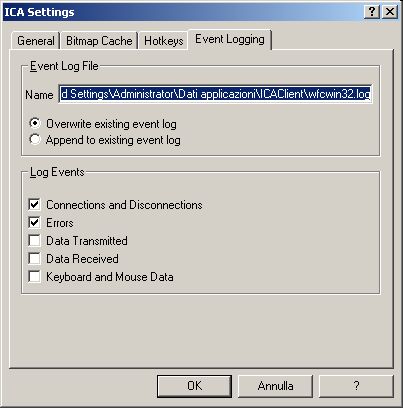
Name : specifies the name of the log file where events will be written :
Overwrite existing event log : specifies that the existing
log file should be overwritten each time theICA client is restarted and new
event information is created.
Append to existing event log : specifies that the existing log file
sholud be kept and new events should be added to the end of the log file.
Connections and disconnections : specifies that an event should
be added to the event log whenever the ICA client connect or disconnect from
a XP server.
Errors : specifies that an event be added to the event log
whenever the ica client encounters an error.
Data transmitted : specifies that an evet be added to the event
log each time a packet is sent to a XP server from the ICA client.
This propert is intended for technical support purposes only.
Data received : specifies that an evet be added to the event
log each time a packet sent by a XP server is received by the ICA client.
This propert is intended for technical support purposes only.
Keyboard and mouse data : specifies that an event be added
to the event log whenever a key is pressed or the mouse is moved on the ICA
client.
This propert is intended for technical support purposes only.
CUSTOMIZING MODEM PROPERTIES
Client device can comunicate with XP server through a modem.
A user can use the Phone and modenm options in the control panel or the Tools
--> Modems menu item.
The Properties button within the Phone and modem options displays a dialog with
three tabs :
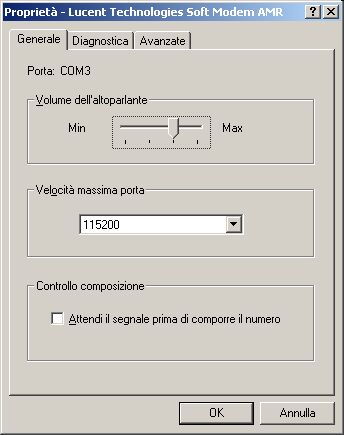
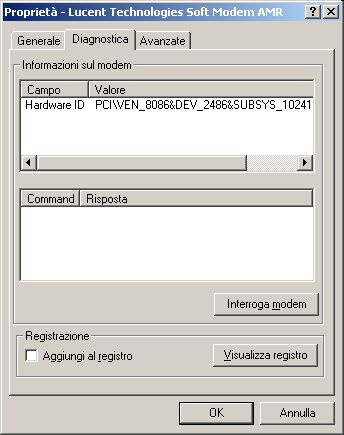
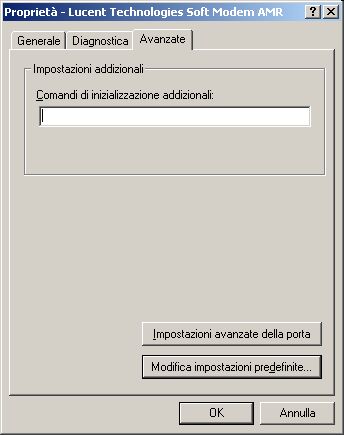
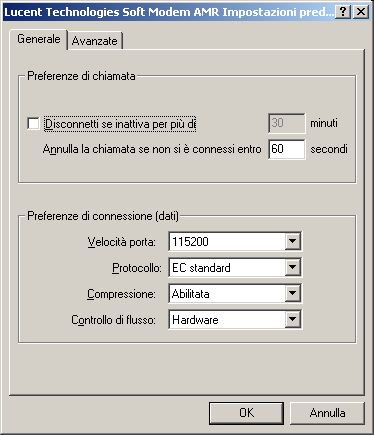
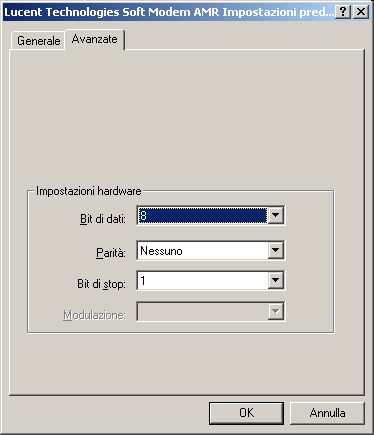
Click su Modifica impostazioni predefinite (Change default preferences) to view the next two image :
CUSTOMIZING SERIAL DEVICE PROPERTIES
Client devices can use serial devices to connect to a XP server.
A user can add a serial device to PN using Tools --> Serial Devices menu
item.
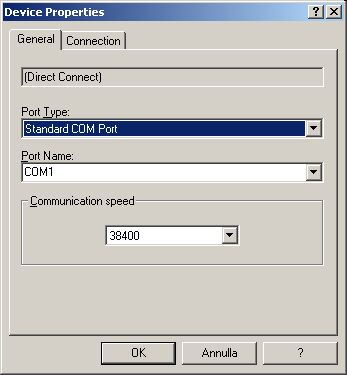
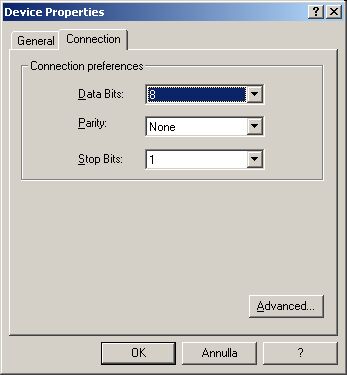
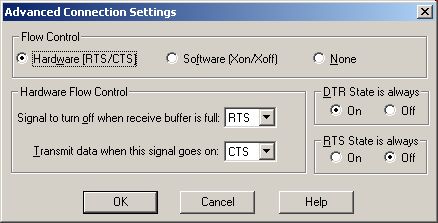
Click Properties to view the follow image :
GENERAL
Port type : specified the type of COM port used
Default is Standard COM port.
Port name : name of the COM port.
The name can be selected from the list or typed into the field.
Communication speed : speed of the serial (baud rate) connection.
The baud rate of the serial must match the baud rate of the XP server.
CONNECTION
Data bits : specifies the number of data bits.
This value is always 8 for ica connections.
Parity : specifies the serial parity should be used.The following
options are available :
Stop bits : specifies the number of stop bits to use.A stop bit is the last bit of an asynchronous character that ensures recognition of the next start bit.Use one as the stop bit.
ADVANCED BUTTON
Flow control : specifies the buffering scheme used to prevent
the loss of data for serial devices operating at different rates.
The following options are available :
Hardware flow control : specifies the type of hardware flow
control to use if hardware (RTS/CTS) is selected.
Signal to turn off : specifies which signal to turn off when
the ICA client receives a 'buffer is full' message.
The following properties are available:
Transmit data : specifies the signal the deivce should use
when the ICA client is allowed to transmit data.
The following properties are available:
DTR state is always : specifies the data termianl ready state
to be used to identify when data terminal equipment (DTE) is ready to transmit
data.
RTS state is always : specifies the request to send state should
be used to identify when the data termianl equipment (DTE) is ready to transmit
data.
After a serial device has been added, it will be available for selection with
the ICA dial-in option for custom ICA connections.
Users can also change the properties of existing custom ICA connections to use
the serial device.